Taking Your Own Suit Measurements
A well-fitting suit will always look superior to an ill-fitting one, regardless of the price difference. Even the most expensive designer suit is wasted if the trousers are too wide or the sleeves too short. Many people shy away from fully tailored suits, torn between the high cost of a professional tailor and the fear of measuring themselves incorrectly. The good news is that taking your own suit measurements is quite simple. Just follow the guide below, and you'll be ready to order a bespoke suit in your size from us.
First things first
Before you begin, you'll need a flexible cloth measuring tape and a pen or some way to note down your measurements. If you have a jacket, shirt, and trousers that fit you well, you might want to wear them, as they can help you judge certain measurements. Having a friend assist can also be helpful, but it's not necessary.
It’s All About the Numbers
Once you're ready to take your measurements, follow the list below. Follow the illustrated instructions using a relaxed but firm hand, and avoid pulling the tape measure tight. Perform each measurement three times for accuracy and round all final measurements to the nearest half inch. Start by recording your height and weight (in lbs or kg) to help us with overall sizing and verifying your measurements.
Jacket Measurements
1. Chest

Stand up straight and hold the measuring tape at roughly nipple level, wind it under the armpits and over the shoulder blades. This should be the circumference of your chest at its widest point. For women you should provide two chest measurements, over-chest as described here passing around the widest point of the chest, and under-chest measurement, which is the same but with the tape passing round underneath where the wearers bra typically finishes.
2. Stomach
Measure the widest part of your abdomen, usually around the level of your belly button, ensuring the tape is level. Try not to suck your tummy in, else the measurement will be too small.
3. Jacket Length

Measure vertically from the where the back body of the shirt meets the collar seam to the desired length of the waistcoat usually somewhere from the lower back to the top of the seat.
4. Shoulders
Measure across the top of the back arching from the tip of one shoulder to the tip of the other, its should not be a perfectly straight line but rather follow your natural curvature of the upper back. If you struggle to identify the tip and have a shirt that fits well, you can simply measure between the shoulder seams.
5. Sleeve Length
With your arm relaxed at your side, measure from where shoulder seam meets the crown down to your desired length, generally at the base of the thumb where it meets your wrist.
6. Neck

Measure the circumference of your neck at the height where your collar would sit. If you wish to be sure you of the height you can wear a shirt that fits you well.
7. Hip
Measure from where the shoulder seam meets the collar seam to your desired jacket length, which for men is usually around the wrist/base of the thumb.
8. Bicep

Flex your arm to 90 degrees and measure the circumference of your bicep at its widest point.
-
Trouser Measurements
1. Trouser Waist

Measure around your waist at the height where you would like to wear your pants, which is likely different than your natural waist. Do not pull the tape measure too tight. If you are not sure and have an existing pair of trousers that fit as you would like, wear them, and measure around the waist band where they sit.
2. Hips
Measure around the fullest part of your hips AND seat (tailor term for bum). Stand feet hip width apart, making sure your pockets are empty and the tape is level and untwisted. You should just barely feel the tape against your body.
3. Crotch / Rise
Place the end of tape measure at the top of waist on the front where the central button is. Then ensuring it doesn’t get twisted, place the tape measure through your legs and measure to the top of the waist on the back. It’s useful to wear a pair of trousers that you know fit you well so you allow for necessary room in the crotch.
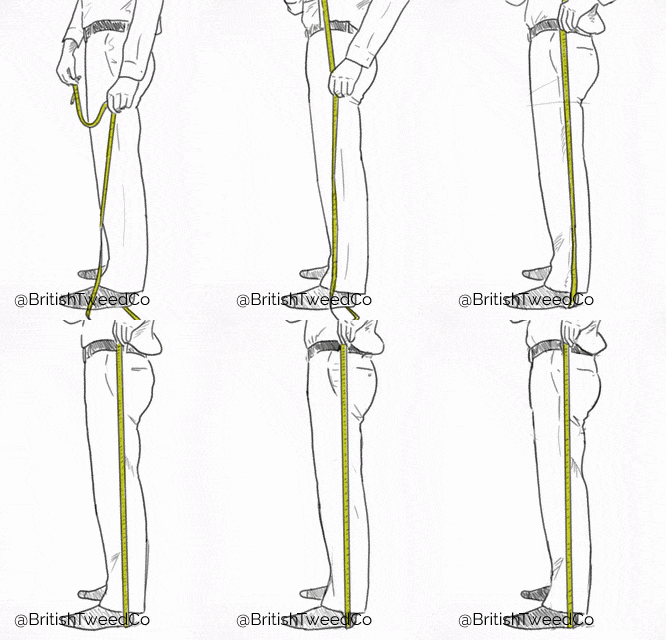
4. Trouser length / Out-seam
Measure vertically from the top of where you want the trouser waist to sit down along the side pant seam, to the desired trouser length. This is typically around 3cm above the ground. If you want to help you can a pair of trousers you know fit you well, and/or wear shoes similar to those you intend to wear with the suit.
5. Cuff

Measure vertically from the point where you want the cuff of your trousers to end, typically at the ankle, to where the trouser seam meets the outer side of your leg. The cuff usually sits just at the top of your shoe, allowing for a slight break. To help, you can use a pair of trousers that fit you well, and wear the shoes you plan to pair with the trousers for a more accurate measurement. Adjust the length depending on how much of a break you prefer at the shoe.
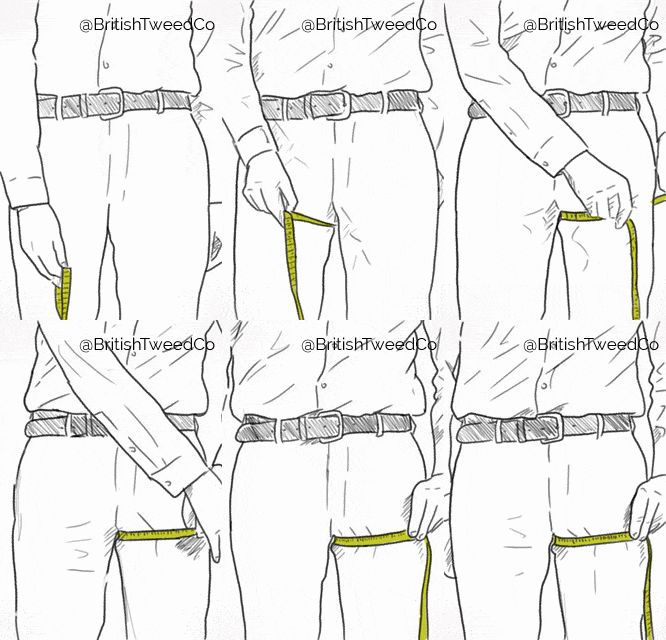
6. Thigh
Measure the circumference of your thigh at its widest point, this is usually near the top of the inseam but may be slightly lower depending on your physique.
FORM:


